This tutorial is based on Chubbable’s post with some modifications and correction. Compared to the original post, there has been several changes since the time of posting. It is still one of of the most accurate tutorials for installing Opencart on DigitalOcean that I could found. Thanks Chubbable All the images in this post are from Chubbable’s article.
Step 1: Create a VPS with LAMP
- Login to your Digital Ocean account and click on the Create Droplet button.
- If you just want to play around, you may opt to choose $5/month. But if you’re migrating your OpenCart store from a shared hosting service, then $10/month should be minimum.
- Choose a Region or Location. It’s best if you choose the location of your Data Center that is closest to your target audience.
- Select Image / Application. Click on the Applications tab and scroll down a bit and click to choose LAMP 16.04.
- Create an SSH Key Pair to use with your OpenCart VPS (optional).
- If you’re on Windows, then follow this video tutorial on how to create SSH Key Pair on Windows.
- If you’re on Linux, this video guide will teach you how to create your SSH Key Pair for your VPS.
- Copy and paste in the content of your .pub SSH key. Enter a comment or name for it.
- Create an SSH Key Pair to use with your OpenCart VPS (optional).
- Finally, click on the Create Droplet button. This should start creating your VPS.
That’s all for creating your VPS. LAMP should be installed after your droplet is created.
Step 2: Login to your OpenCart VPS
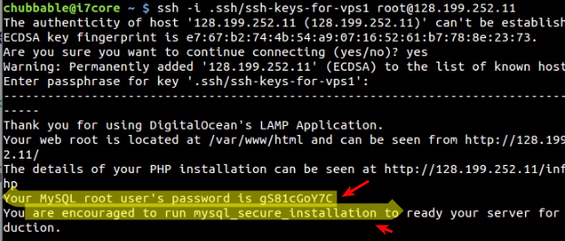
Login to your newly created VPS and use your IP address. Copy the IP address from your hosting control panel. Then launch a terminal (or PuTTy if on Windows) and SSH your way in to your VPS. The command for ssh:
ssh -i .ssh/name-of-your-ssh-key [email protected]
- Note: In Linux or Unix, the default SSH folder path is ~/.ssh or /home/anyuser-name/.ssh
Secure MySQL server by following the wizard.
-
Take note first of your MySQL root password. Write it down or copy to somewhere safe.
-
Now run
mysql_secure_installationand follow the wizard. -
Enter mysql_secure_installation command and enter your copied MySQL root password.
-
Then answer the following question like so:
Enable password validator? - answer n for no
Change the root password? - answer n for no
Remove anonymous users? - answer n for no
Disallow root login remotely? - answer n for no
Remove test database and access to it? - answer n
Reload privileges? answer y for yes
And it should be all done after that.
Step 3: Update the system & install Unzip
Update your system by doing the following command: apt-get update && apt-get upgrade
It should take a little while to complete.
Install Unzip via apt-get, this software shall be used to extract the download archived file o OpenCart. Run the command
apt-get install -y unzip
Step 4: Download OpenCart & extract
While still on your terminal, type wget then SPACEBAR then paste in the copied download link address, and hit ENTER key. The command should look like below.
wget https://github.com/opencart/opencart/archive/master.zip
Do a ls command on your ~ (home) folder, you should see a new file named master.zip
Extract the file by doing unzip command:
unzip master.zip
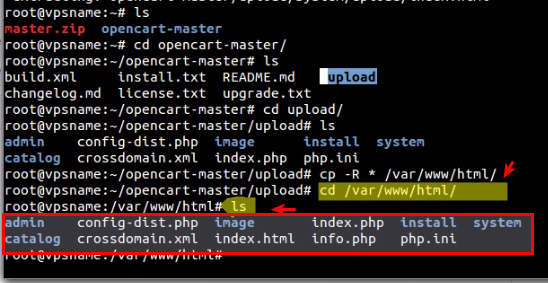
Do a ls command. You shold see a new folder named opencart-master Copy the contents of the upload folder, which is inside of opencart-master folder, to /var/www/html. This folder should hold all the OpenCart files, it’s your public_html folder.
If you make a cd opencart-master command, you should see the folder.
To copy all the files inside the upload folder, do the following command:
cp -R ~/opencart-master/upload/* /var/www/html/
Double-check that you have copied all the files, do the following;
cd /var/www/html
Then do a ls command.
Step 5: Create OpenCart config.php file
The command;
touch /var/www/html/admin/config.php
and
touch /var/www/html/config.php
Step 6: Set folder permission and owner
To set folder owner for the OpenCart folder, do the following command:
chown -R www-data:www-data /var/www/html
To set folder permisson, 755 for all folders while 644 for all files:
chmod -R a=r,a+X,u+w /var/www/html
Step 7: Enable Mcrypt PHP module
There are several module missing from LAMP installer. Thus, we have to install these ourselves. Please take note that the last two are not required by Opencart, but will cause error with refreshing module and installing extension
apt-get install php7.0-curl
apt-get install php7.0-mcrypt
apt-get install php7.0-zip
apt-get install php7.0-xml
apt-get install php7.0-dom
Restart Apache webserver
service apache2 restart
Step 8: Create OpenCart Database
Let’s create a new database for OpenCart exclusive use. We will use the command-line, so no PHPMyAdmin involve here. Login as root to MySQL server
mysql -u root -p
Then enter your root password. It won’t be printed on your screen.
Create the database
For the sake of demonstration, I will name my OpenCart database as opencartdb, user is opencartuser, password is letmepass. So here we go…
create database opencartdb;
Hit Enter key.
Create the database user and grant privileges
grant all on opencartdb.* to 'opencartuser'@'localhost' identified by 'letmepass';
Hit enter key.
Refresh MySQL
flush privileges;
That’s it! That’s how to create a database using command-line. Next, install OpenCart.
Step 9: Install OpenCart
Time to install OpenCart
Launch your favorite web browser and point to your VPS IP address.
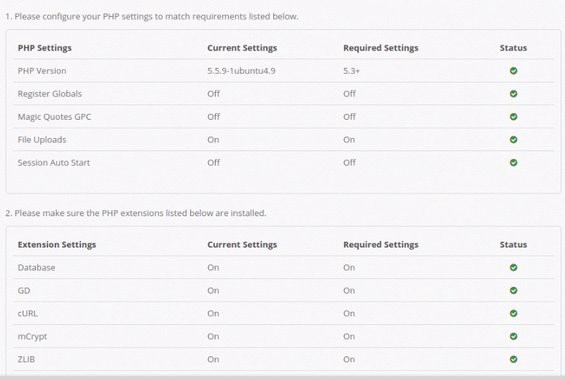
You should be redirected to OpenCart’s installation wizard.
Check the page, make sure that all is green. Which means… all the requirements are met by your VPS.
Everything is straight-forward on this page, just fill all the fields with the proper data and install OpenCart. Click Continue button till you finish installing it. Delete the install folder for security reason.
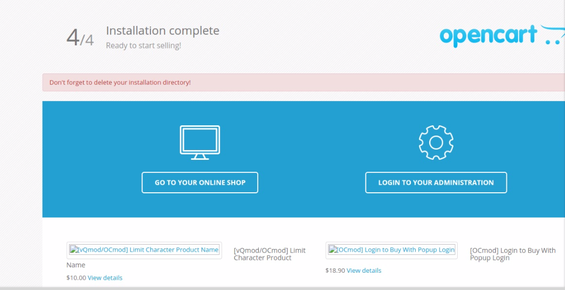
rm -rf /var/www/html/install
And that’s it! If you reached this far, then pat yourself on the back.